 Pin it
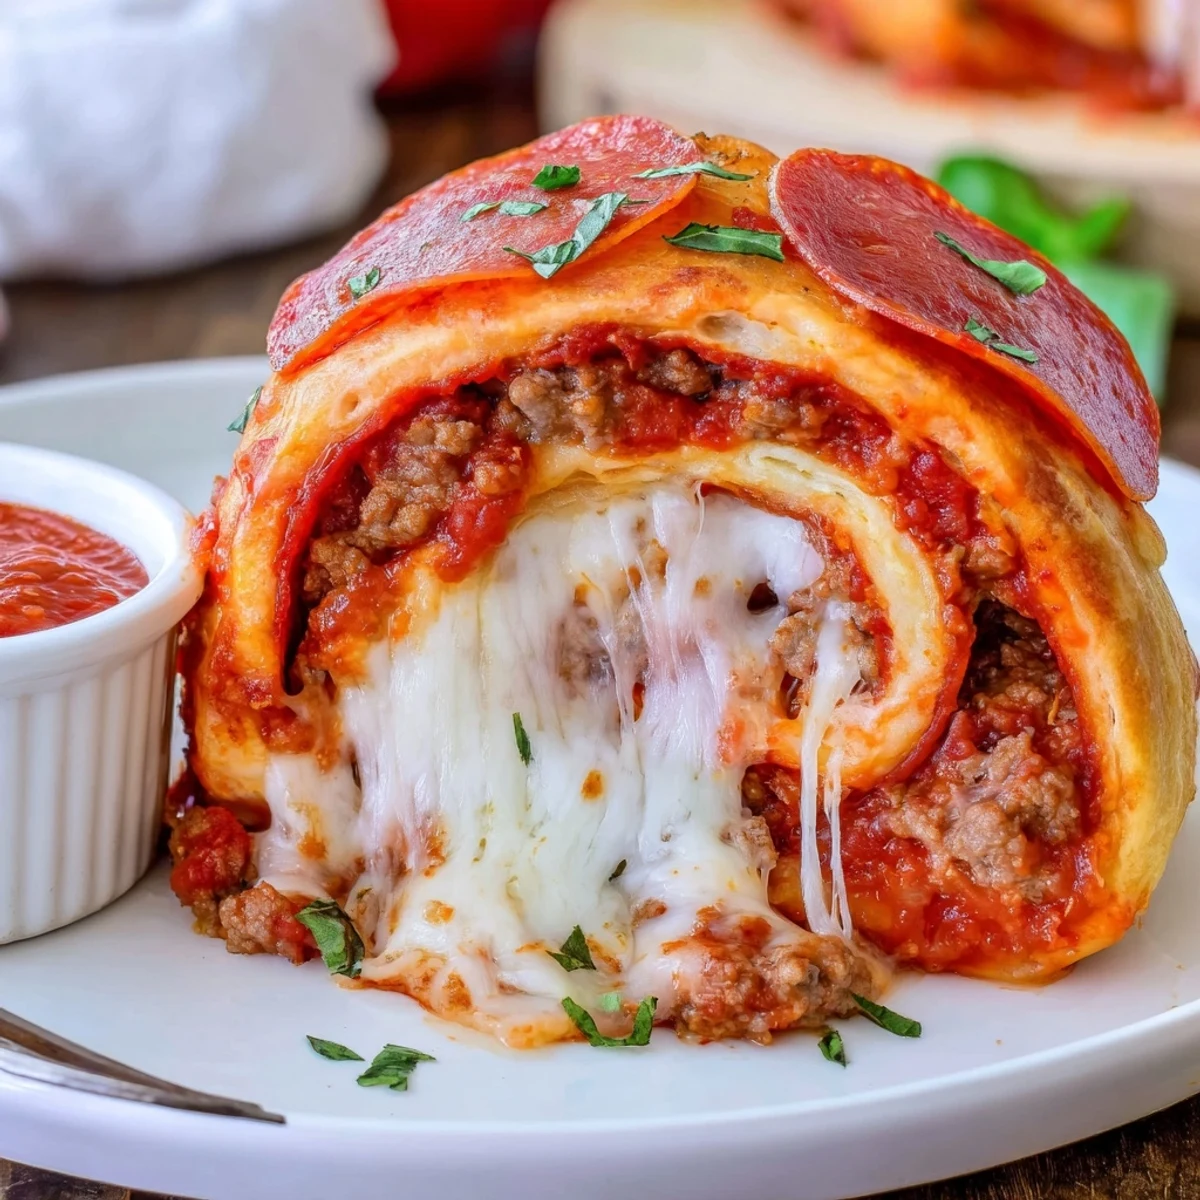
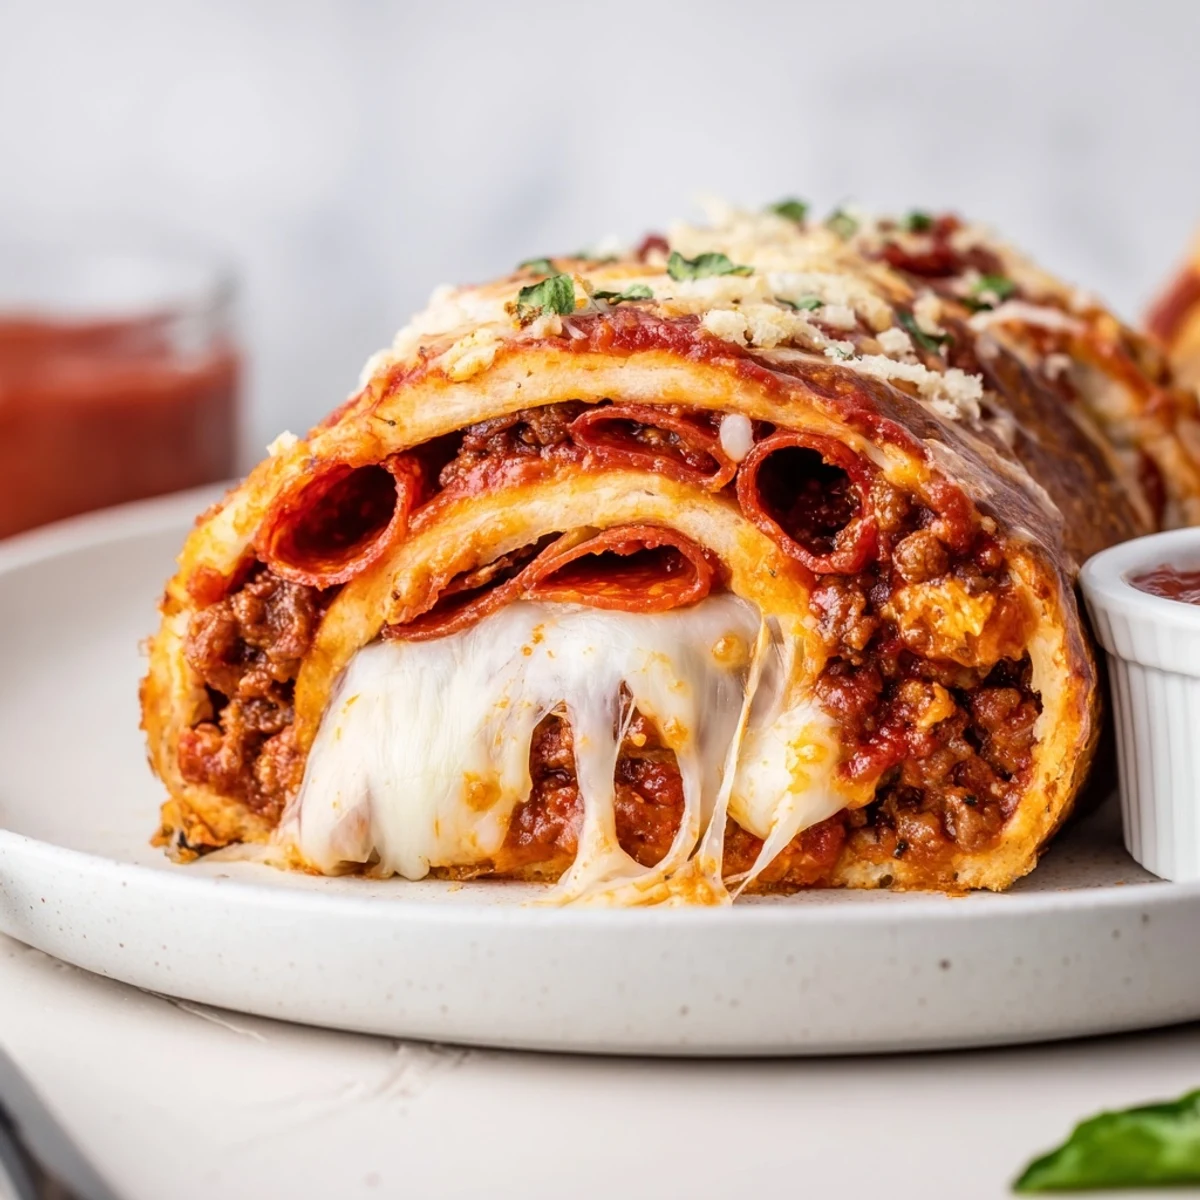
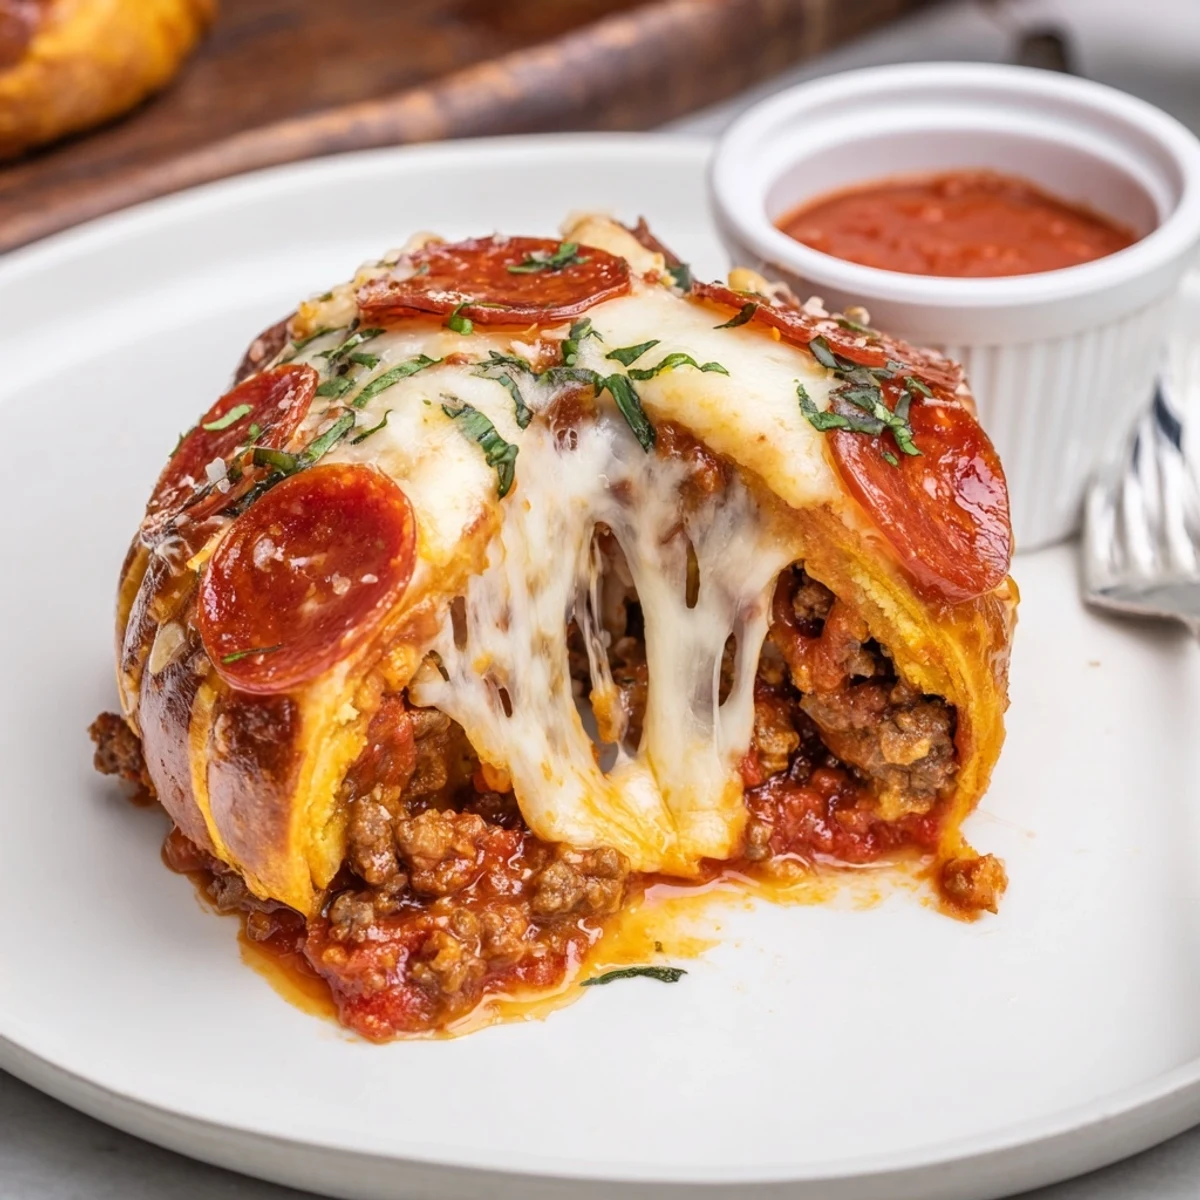
 These cheesy roll ups combine seasoned ground beef, spicy pepperoni and melted mozzarella inside refrigerated pizza dough. Brown the beef with garlic and Italian herbs, spread sauce on rolled dough, layer fillings, roll into a log and cut into eight pieces. Brush with olive oil and bake until golden and bubbly. Cool briefly before serving with extra sauce; they freeze and reheat well.
The sharp sizzle of ground beef meeting a hot skillet is one of those sounds that always means something good’s cooking. Making these Cheesy Beef Pepperoni Pizza Roll Ups happened one particularly busy afternoon when I needed something snackable, fun, and hearty on the table fast. The aroma of oregano and garlic mingled with melted cheese was enough to lure everyone into the kitchen before I’d even sliced them. Sometimes the best kitchen wins are the ones you can pick up with your hands—no plates required.
The first time I pulled a tray of these bubbling, golden roll ups from the oven, I barely had time to set them down before a flurry of hands grabbed for them—kids, friends, everyone. The batch vanished almost instantly, followed by laughter over marinara-stained fingers and a collective demand to make more next time. There was a definite sense that this was no ordinary snack, but the kind of eat-with-your-fingers fun that gathers everyone together, even when no one planned it.
Ingredients
- Ground beef: Go for a leaner beef, and make sure to drain the fat, so the filling stays flavorful without being greasy.
- Pepperoni: Use your favorite—classic rounds or spicy sticks, but layer them evenly so every bite gets that burst of flavor.
- Shredded mozzarella cheese: It’s the melty foundation; always shred freshly if you can for best melt and stretch.
- Grated Parmesan cheese: Adds a punch of savory depth that sharpens every bite.
- Refrigerated pizza dough: This is the shortcut hero here—unroll and you’re good to go.
- Pizza sauce: A little goes a long way; spreading it thin keeps the dough from getting soggy.
- Dried Italian herbs: These wake up the beef and give a classic pizzeria aroma in your own kitchen.
- Garlic powder: The difference between “good” and “irresistible”—don’t skip it.
- Salt and pepper: Always season to taste, because cheese and pepperoni already bring saltiness.
- Olive oil: Brushed on top, it helps the rolls bake up gloriously golden.
- Fresh basil or parsley: Not essential but a sprinkle at the end adds a fresh lift and a pop of color.
Instructions
- Get prepped:
- Fire up your oven to 200°C (400°F) and cover your baking sheet with parchment paper—less mess, more crispiness.
- Sizzle the beef:
- Drop the ground beef into a warm skillet, letting it brown while you stir in salt, pepper, garlic powder, and herbs; the kitchen will smell mouthwatering within minutes. Once cooked, drain off the fat and let the beef cool enough that the cheese won’t melt away on contact.
- Roll the dough:
- On a lightly floured surface, roll out the pizza dough into a rectangle—a rolling pin makes it easy, but hands work fine too.
- Add the sauce:
- Spoon pizza sauce over the surface, spreading it almost to the edges but leaving a border so nothing leaks out.
- Layer the fillings:
- Scatter the beef evenly, then arrange the pepperoni slices—all topped with both cheeses so every section gets a bit of everything.
- Roll and slice:
- Starting on the long side, gently but firmly roll it up into a tight log; use your fingers to pinch and seal the seam. Slice into 8 even pieces using a sharp knife, and arrange them cut-side up on your baking sheet.
- Get golden:
- Brush the tops with olive oil to ensure maximum crisp; you’ll notice the sheen as they hit the heat.
- Bake to bubbly:
- Place in the oven and bake for 12–15 minutes until puffed, golden, and smelling outrageously good.
- Cool and serve:
- Let them rest for three minutes, then hit with fresh herbs if you’re feeling fancy. Serve right away with more pizza sauce for dipping—they won’t last long.
 Pin it
 I think my favorite moment was making these for a game night—everyone was rooting for their team, but when the kitchen timer dinged, there was a shared pause as oven-door warmth escaped and the smell of bubbling cheese called everyone to gather. Even those who’d sworn they weren’t hungry grabbed for a hot roll up, grinning as strings of mozzarella stretched from roll to plate. Something about hand-held bites breaks the ice every time, making snack hour a little more memorable.
How to Make the Filling Extra Flavorful
If you want depth to the filling, cook the beef with the full dose of Italian herbs and adjust the salt after tasting—it makes a difference. Sometimes I like to add diced onions or even a pinch of chili flakes for a touch of heat. Colorful bell peppers are a family favorite if we’re cleaning out the fridge, and blending the cheeses adds complexity. Finding the balance between spicy pepperoni and creamy mozzarella is what makes each bite pop.
The Trick to Rolling and Slicing
Patience comes in handy here—if you rush rolling or use dough that’s too cold or warm, you’ll end up tearing it instead of creating a neat log. I’ve found using a serrated knife and swift, confident cuts prevent the fillings from squishing out the sides. Give your roll ups space on the baking sheet too, so they can crisp up instead of steaming. Rolling up tight but not too tight is the sweet spot.
Serving Ideas That Steal the Show
Last time I made these for a party, I served them alongside a few bowls of dipping sauces—extra pizza sauce, ranch, and even spicy sriracha mayo, which turned into a surprise hit. Letting kids sprinkle their own parsley or basil is an easy way to get them involved, and leftovers (if you have any) can be packed up for lunch the next day. These roll ups also freeze beautifully and reheat well in the oven, getting that fresh-out-of-the-oven taste all over again.
- Add a finishing swipe of garlic butter for more flavor.
- Pair with a simple green salad to round things out.
- Always keep extra napkins on hand—things might get delightfully messy!
 Pin it
 Sometimes what starts as a quick snack turns into the part of the day everyone remembers. May your kitchen always be filled with laughter, hot cheesy snacks, and the aroma of something wonderful baking.
Recipe FAQs
- → How long should I bake the roll ups?
-
Bake at 200°C (400°F) for about 12–15 minutes, until the dough is golden and the cheese is bubbling. Thicker slices may need a couple more minutes.
- → Can I make these ahead and reheat later?
-
Yes. Assemble and store in the fridge for a few hours before baking, or bake fully and reheat in a 180°C (350°F) oven to crisp the exterior and melt the cheese again.
- → What are good substitutions for ground beef?
-
Use ground chicken, turkey, or a plant-based mince. Adjust seasoning and drain any excess fat before assembling to avoid soggy dough.
- → How can I make them spicier?
-
Add chili flakes to the beef while cooking, choose spicy pepperoni, or include a thin layer of sliced jalapeño or hot pepper under the cheese for built-in heat.
- → Can these be frozen?
-
Yes. Freeze unbaked roll-up slices on a tray until firm, then transfer to a sealed container. Bake from frozen, adding a few extra minutes until golden and heated through.
- → How do I keep the bottoms from getting soggy?
-
Drain browned beef well, avoid over-saucing the dough, and use a preheated baking sheet or parchment to promote even browning. Brushing with olive oil helps crisp the top.
